Herbarium Specimen Preparation
Herbarium specimens support important ecological and plant research. Each specimen is an important data point and great care must be taken when collecting and recording information in the field. The specimens must be field collected, pressed, dried, identified and have a label attached. The specimen will be properly mounted on herbarium sheets and stored. The goal is to permanently preserve plant specimens for long-term study.
Decide in advance where you will be collecting. Regulations about collecting plants vary. You may need to obtain or be in the company of a person who has Collecting Permits from public land agencies (ie. San Bernardino National Forest) or written permission from private property owners (ie. San Manuel Tribal Council) PRIOR to collecting any plant(s). Always know collecting protocols for your collecting site; and be aware of locally rare or threatened plant species.
Make a checklist of what you need to take in the field:
It is difficult to carry a press into the field, so put your specimen in a plastic bag along with a number tag matching the collection number in your field notebook. It is best to put one specimen per bag. For small and medium plant specimens, plastic bags with a zipper lock are good.
For annual plants, collect the entire plant including the root. For perennials, shrubs or trees, each specimen should have all or part of a stem with attached leaves, and, if possible, flowers, and/or fruits.
If there are many plants of the same species as yours, try to select a plant that best represents the full range of flowering (bud, open and wilted flower) and fruit if any. If the plants are small and plentiful, collect 2 or 3 for mounting to show the range of flowering/fruiting. If there is only one or very few of the plants, and especially if it is an unknown species to you, it is best NOT to collect it, unless that is your assignment for research purposes and you have the proper permit.
While collecting, get an extra plant (if small and numerous) or flowers to use in identifying the plant especially if you are unable to do so in the field. When placing in the press, make certain your specimen fits well into the press. You do not want parts poking out because they will not dry properly. Tall annuals can be folded in half or a "Z" pattern and woody specimens can be cut into two parts to accommodate the press size. Be very careful how the plant is arranged in the press. After the plant has dried, there is no flexibility to "arrange" the plant so it shows the best characteristics.
Data for each plant collected must be recorded in the field and kept with the collected and numbered plant. Do not trust your memory regarding field details. Always record data at the time of collection. Notes to take include:
The collection number is a unique number the collector assigns to a collected plant. Some collectors just number the plants they collect sequentially (#1 through ... however many they have collected in their life). Others use some type of code that combines the date of collection with the number of the plant collected that day (e.g., 2020-5-15-42 might be the 42nd plant this person collected on May 15, 2020).
For the following questions, I am going to assume you have permission to collect wherever you are collecting.
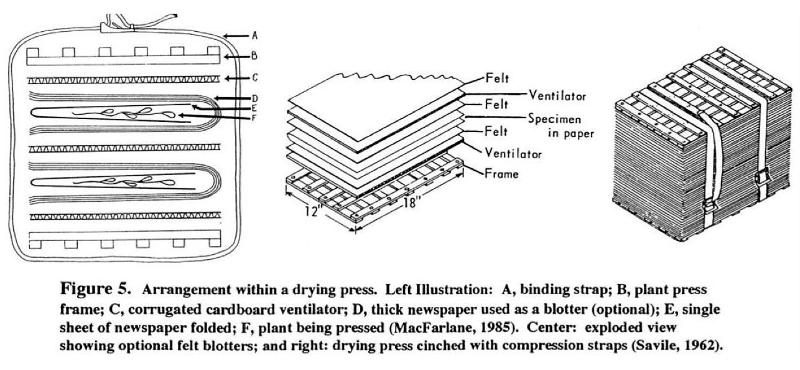
Press a plant in the field or shortly after collecting as possible. Specimens are pressed in a plant press. This process involves alternating ventilators (corrugated cardboard), felt blotters and individual specimens carefully arranged and placed inside a newspaper. (See figure 5 below).

Arrange the plant so that it will fit on a standard herbarium sheet (11.5" x 16.5"). It is difficult to rearrange the specimen after it is dry and stiff.
Arrange the plant so that all all parts necessary for identification will be visible after it dries and is glued to the sheet. The plant should look semi-natural, but it is best to be able to see the abaxial sides of some leaves, the adaxial sides of others, different views of flowers, etc.
Placing plants in the press is like building a layered sandwich:
Stack remaining plants in this manner and place the stack between the two frames. The plant press is tightened using straps or cords. The objective is to extract moisture in the shortest period of time, and to yield material that can be mounted on herbarium paper for storage in an herbarium.
Pressing flowers has been a hobby for a long time, and it can work well. You just need a big book, something absorbant (like paper towels), and the plant.
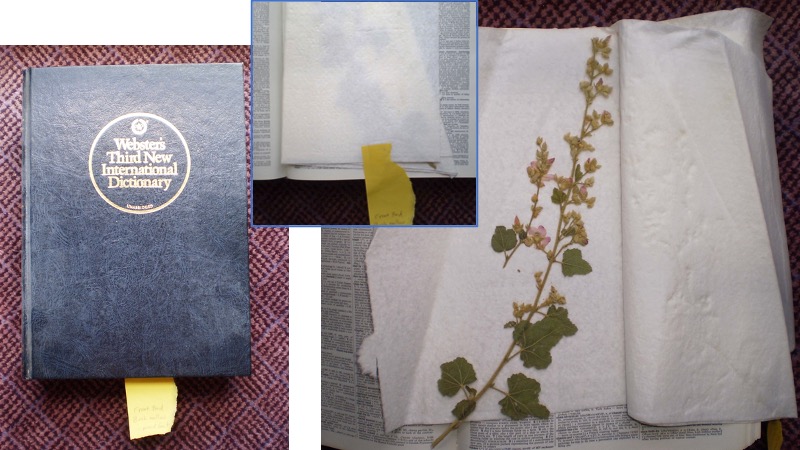
The main thing missing here is ventilation. Moisture will move from the plant into the paper towel, but it cannot leave the book rapidly. You can remove moisture by repeatedly changing the outer layers of paper toweling (not the inner one that encloses the plant).
The label accompanying a good specimen can be a significant contribution to scientific records. Make labels before attempting to mount the specimen on herbarium paper. Assume that your work will be of value for hundreds of years later. Faded ink or incomplete or illegible entries can negatively impact the usefulness of the specimen. Labels should be printed on good rag content and acid free bond paper about the size of a 3" x 5" index card; large enough to contain complete information, yet small enough not to take up too much room on the herbarium sheet.
A pressed plant without label information has no scientific value.
The following information is essential:
Plant Family: (ie. Asteraceae)
Scientific name: Genus and specific epithet with authority.
Collector(s): Full first and last name and middle initial.
Detailed location: Give enough detail to locate the plant(s) in order to obtain further research material. The location will consist of country, state, county or municipality and a description of the location in reference to roads, road junctions, mile markers and distances from cities and/or towns. Include any permanent built landmarks and/or natural geographic features. Latitude/longitude, section, township and range, and elevation may also be helpful. A location taken with a Global Positioning System (GPS) is a desirable complement to the locality description, but cannot be used as the sole locator. For more information on GPS referencing, see: https://www.floridamuseum.ufl.edu/herbarium/methods/Georeferencingbestpractices.htm
Habitat: the type of plant community (eg. chaparral, coastal sage scrub) where the plant is growing and, if known, other companion plants growing in the vicinity.
Plant habit: describes the form of the plant (tree, shrub, vine, herbaceous perennial, annual).
Plant description: For perennials and woody shrubs, measure and record the height and spread. For trees, measure spread and diameter of trunk at breast height (dbh). Describe characteristics of the plant which may be lost upon drying, such as flower/fruit color and fragrance, leaf orientation and unusual aroma.
Collection number: optional
Date of collection: Format with the month spelled out or abbreviated and 4 digit year. (30 April 2020, April 30, 2020 but NOT 4/30/20).
All measurements, elevation, distance must be in metric units.
Rember that herbarium specimens serve as data points. That means that all information on the label should consist of observations that you make about this particular plant and its surroundings. No information should come from books or other sources.
Furthermore, anything that is obvious to someone looking at the specimen should NOT go on the label. Only note it if the characteristic is likely to disappear over time. For instance, you should NOT write that the plant "has opposite leaves" when the plant on the herbarium sheet has opposite leaves. In contrast, noting that the "petals are magenta with white strips in the throat" might be important if the flower turns gray overnight (it happens) or fades to brown over the next 300 years (that also sometimes happens).
Uses of herbarium specimens have changed over the centuries.
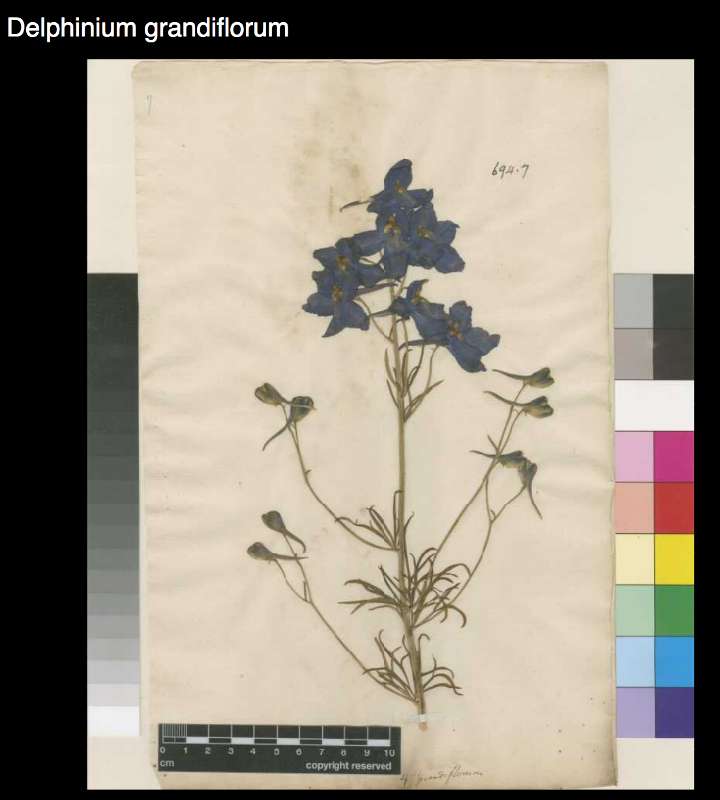
Herbarium specimens were originally used just to identify plants, and to describe and catalog plant diversity. Very little written information was needed to simply identify or describe a taxon. Many older specimens, such as Carl Linnaeus' specimen of Delphinium grandiflorum, below, have only handwritten notes about the plant's name.
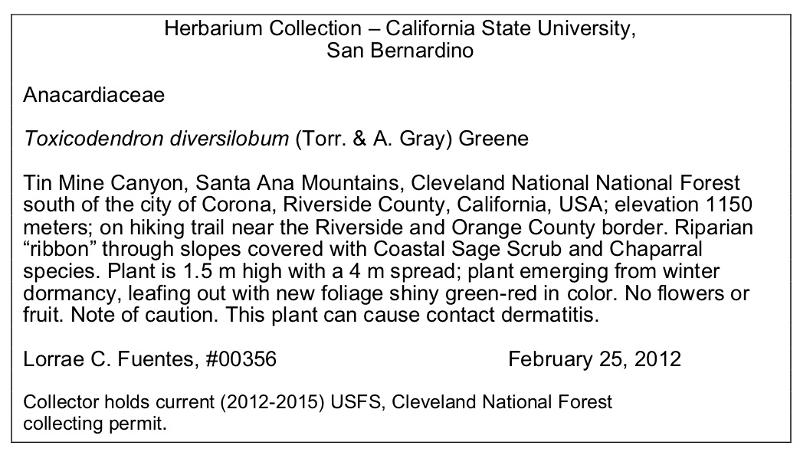
As the uses of herbarium specimens have diversified, the amount of information expected on an herbarium sheet has increased.
The relatively recent push to get herbarium records into forms that are searchable and mappable requires that data on latitude and longitude be provided.
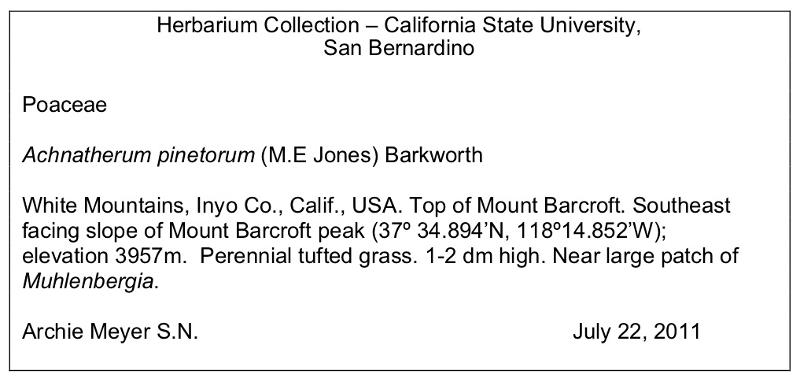
Below are two examples of labels from relatively recent collections.
Check your understanding:
Look at the herbarium label below:
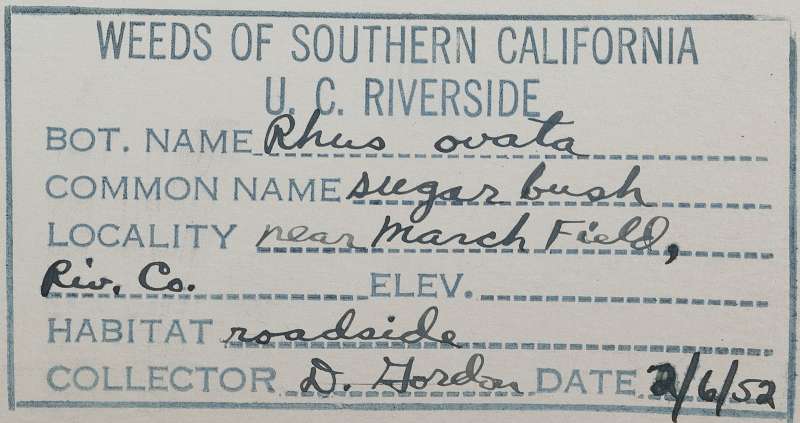
The point is: the date is ambiguous. This would be important if you were studying phenology.
For the following questions, refer to the herbarium specimen linked here. (It will pop up in a new tab or window.)
Note: For Spring 2020, you can just skim this section
Mounting is the process of affixing a dried pressed plant and its label to a sheet of heavy paper. This allows the specimen to be handled and stored with minimum damage.
Supplies Needed:
Gluing the Plant Specimen:
Arrange the plant and label on the mounting paper before gluing anything down. Labels are placed in the bottom right corner. Paint a smooth, light coat of glue on the entire back side of the label. Affix the label in the bottom right corner, smooth it down.
Each plant will need a different amount of glue. Put more glue along the stems, less glue on the leaves and the least glue on the flower and fruiting parts. There are two methods for applying glue to the plant depending on how delicate or how robust the plant specimen is. Often the decision is to use a combination of both. The general rule is use glue sparingly to attach the plant. Too much glue may obscure the flowers and fruits after drying and make identifying characters difficult to see.
Gluing Steps:
The glue dries in 8 hours or less (overnight). Remove the specimens from the stack. They are now ready for storage.
Web Pages
University of Florida Herbarium Specimen Preparation Guide: https://www.floridamuseum.ufl.edu/herbarium/methods/mountingguide.htm
Preparation of Plant Specimens for Deposit as Herbarium Vouchers: https://www.floridamuseum.ufl.edu/herbarium/voucher.htm